In previous post I explained how I developed an Azure Function to send email using SendGrid service. Today I explain how to deploy the Azure Function and how to use it from Wyam generated website.
Deployment
I always prefer automated deployment, but let's deploy Azure Function from Visual Studio this time. Open the Azure Functions project created in part 1 in Visual Studio.
- Change build configuration to Release.
- Right-click the project in Solution Explorer and select Publish....
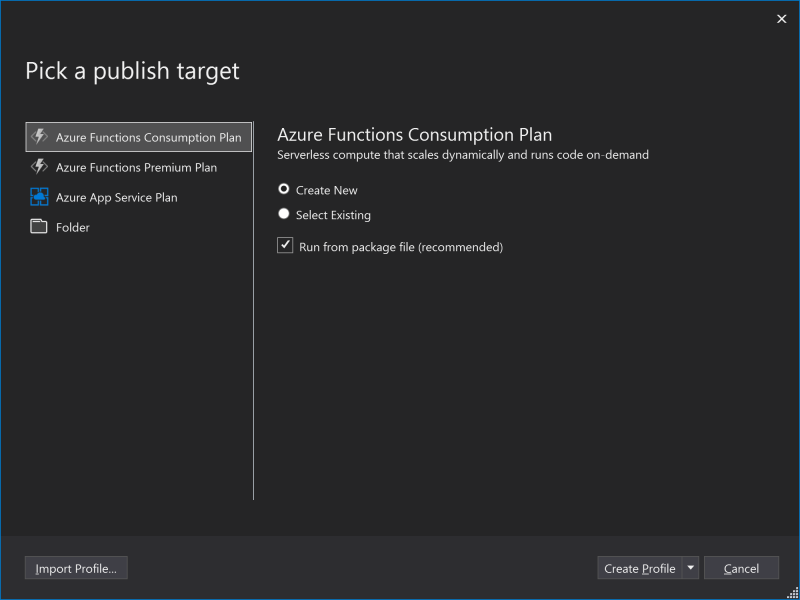
- Select Azure Functions Consumption Plan and Create New. Then click Create Profile.
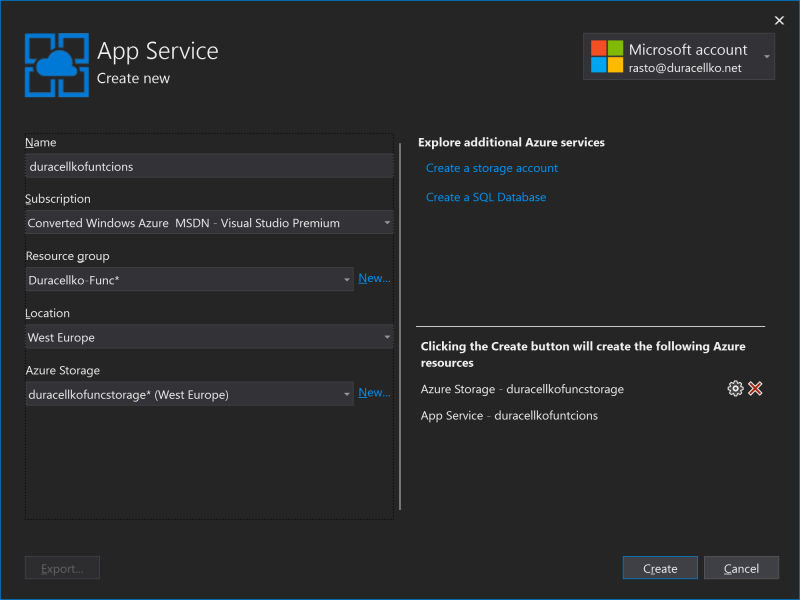
- Dialog for creating Azure Functions resource is opened. Enter name the resource. This will define URL of the Azure Function. Also create new Resource Group and Azure Storage in the dialog. Then click Create button.
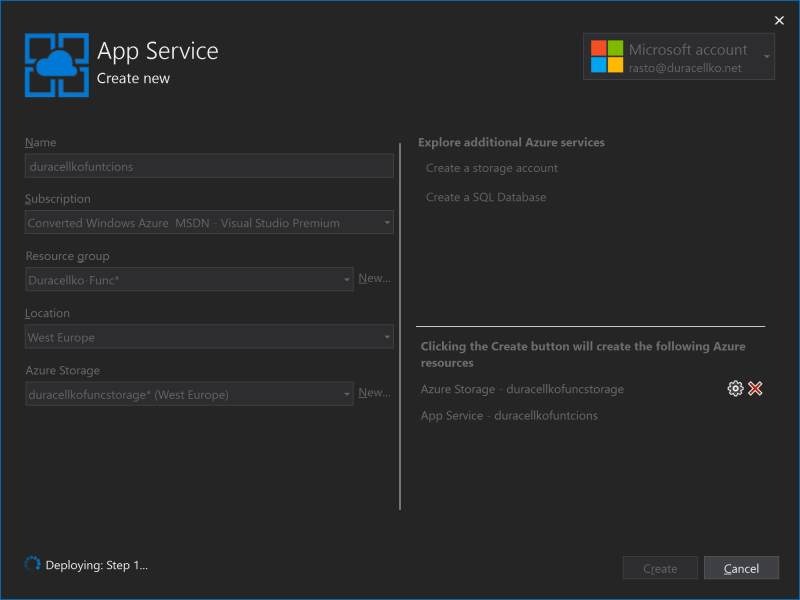
- Wait until Azure resources are is created.
- After the resources are created, Publish window is opened. It should be configured for publishing to Azure Functions resource you just created.
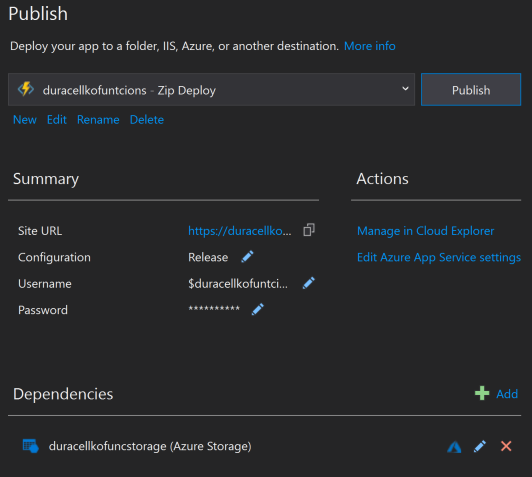
- Click Edit Azure App Service settings. New window with list of settings is displayed. Configure following settings (set Remote value):
- SENDGRID_APIKEY: Your API key for SendGrid account.
- SENDGRID_RECIPIENT : Your email address.

- Click OK to close the Settings window. Then click Publish button to deploy the Azure Function. After little time the function should be successfully deployed.
- Open Azure Portal and find the function you just deployed.
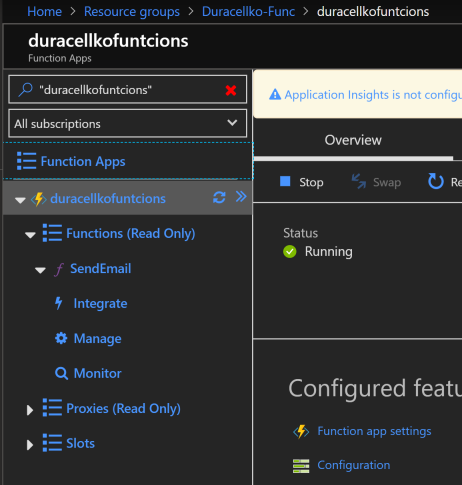
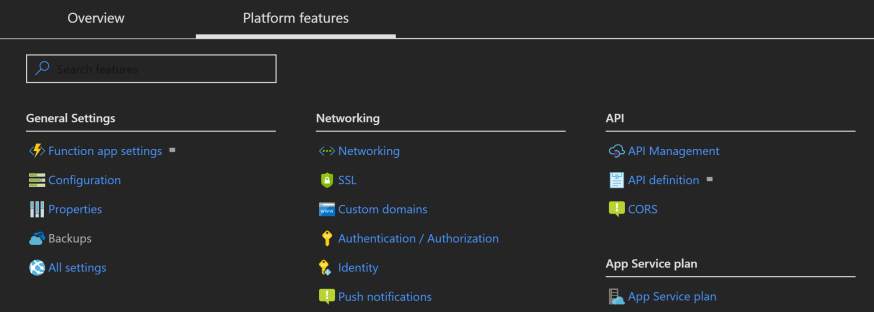
- Open Platform features tab and click CORS.
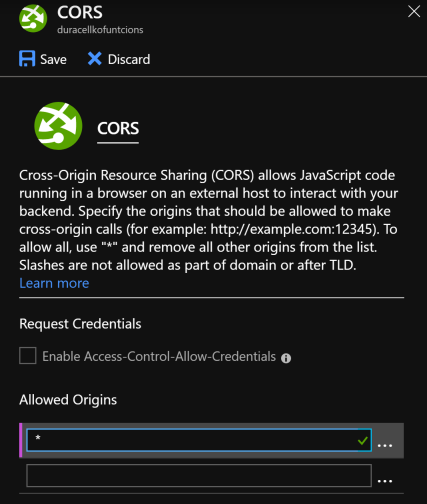
- CORS settings are displayed. Remove all entries from Allowed Origins and add single entry *. Then click Save. This allows to execute the function from any website. For now let's allow any website for testing purposes. However, in the end you should change this setting to domain of your website.
Function to send email is ready now.
Web page
Last part and the most important is to create web page with the contact form. It's possible to use Razor page to do the job. The Razor page contains HTML of the form (no Razor specific syntax is used). I use CleanBlog theme for my page and it already includes Bootstrap and jQuery. And Bootstrap offers nice formatting for forms, including text fields and error messages. Then HTML code looks like this:
<div class="panel panel-default">
    <div class="panel-heading">Contact form</div>
    <div class="panel-body">
        <p>Loading...</p>

        <form id="contactForm" class="form-horizontal" style="display: none;">
            <div id="contactForm-alert-success" class="alert alert-success" role="alert" style="display: none;">
                Message was sent successfully to Duracellko. Thank you for your message.
            </div>
            <div id="contactForm-alert-error" class="alert alert-danger" role="alert" style="display: none;">
                Sending message failed. Please, try again later.
            </div>
            <div id="contactForm-alert-validationError" class="alert alert-danger" role="alert" style="display: none;">
                Please enter valid values in all fields: Name, Email, Subject, and Message.
            </div>

            <div class="form-group">
                <label for="contactFormName" class="col-sm-2 control-label">Name</label>
                <div class="col-sm-10">
                    <input id="contactFormName" type="text" class="form-control" />
                </div>
            </div>
            <div class="form-group">
                <label for="contactFormEmail" class="col-sm-2 control-label">Email</label>
                <div class="col-sm-10">
                    <input id="contactFormEmail" type="text" class="form-control" />
                </div>
            </div>
            <div class="form-group">
                <label for="contactFormSubject" class="col-sm-2 control-label">Subject</label>
                <div class="col-sm-10">
                    <input id="contactFormSubject" type="text" class="form-control" />
                </div>
            </div>
            <div class="form-group">
                <label for="contactFormMessage" class="col-sm-2 control-label">Message</label>
                <div class="col-sm-10">
                    <textarea id="contactFormMessage" class="form-control" rows="10"></textarea>
                </div>
            </div>
            <div class="form-group">
                <div class="col-sm-offset-2 col-sm-10">
                    <button type="submit" class="btn btn-default" data-loading-text="Sending...">Send</button>
                </div>
            </div>
        </form>
    </div>
</div>
The form is hidden at first (style="display: none;"). It is displayed only after JavaScript to hanle the form is loaded. The first part of the form contains messages, which may be displayed to user. The second part contains 4 text boxes to enter Name, Email, Subject, and Message. And the last part contains Send button.
At the end of the page it is necessary to load JavaScript that handles the form.
<script type="text/javascript" src="/assets/js/Duracellko.ContactForm.js"></script>
<script>
    var duracellkoContactForm = new Duracellko.ContactForm("contactForm");
    duracellkoContactForm.init();
</script>
The script creates new object Duracellko.ContactForm and executes initialization. The ContactForm object prototype is defined in Duracellko.ContactForm.js in assets folder.
And the final part is to implement JavaScript ContactForm object prototype. The prototype has single public function init. This function sets properties to HTML fields, hooks on submit event of the form, and displays the form.
// Class to handle HTML form to sent email
var ContactForm = (function () {
    function ContactForm(formId) {
        this._sendEmailUrl = "https://duracellkofunctions.azurewebsites.net/api/SendEmail";
        this._formId = formId;
    }

    ContactForm.prototype.init = function () {
        var form = $("#" + this._formId);

        this._contactFormName = form.find("#contactFormName");
        this._contactFormEmail = form.find("#contactFormEmail");
        this._contactFormSubject = form.find("#contactFormSubject");
        this._contactFormMessage = form.find("#contactFormMessage");
        this._sendButton = form.find("button");
        this._alertPanels = new AlertPanelsCollection(form);

        var _this = this;
        form.submit(function (event) {
            return _this.onSubmit(event);
        });

        // Shows the form and hides "Loading..." paragraph
        form.show();
        form.prevAll().hide();

        this._form = form;
    }

    ...

    return ContactForm;
}());
Duracellko.ContactForm = ContactForm;
You can notice that the code uses jQuery to work with HTML. Even in 2019 jQuery is ideal library for this contact form functionality. It is small, easy to use, easy to integrate, and provides exactly, what is needed.
When user presses Send button, form is submitted and it is handled by onSubmit function.
    ContactForm.prototype.onSubmit = function (event) {
        event.preventDefault();

        this._alertPanels.hideAll();

        var emailData = this.createEmailData();
        if (this.validate(emailData)) {
            this.sendEmail(emailData);
        }

        return false;
    }
The function prevents actual submitting of the form, because that would cause reloading of the page. Then it gets data from text boxes, validates the data, and if it is valid email is sent using the Azure Function.
    // Creates EmailData object from form fields. The JSON object will be posted to web service.
    ContactForm.prototype.createEmailData = function () {
        return {
            senderName: this._contactFormName.val(),
            senderEmail: this._contactFormEmail.val(),
            subject: this._contactFormSubject.val(),
            message: this._contactFormMessage.val()
        }
    }

    // Validates that none of the fields are empty.
    ContactForm.prototype.validate = function (emailData) {
        var result = emailData.senderName !== '' &&
            emailData.senderEmail !== '' &&
            emailData.subject !== '' &&
            emailData.message !== '';

        if (!result) {
            this._alertPanels.showValidationError();
        }

        return result;
    }
Validation is very simple. It checks only if the text fields are not empty. When any of the fields is empty, error message is displayed to user. AlertPanelsCollection object is used to implement that. We will implement this functionality later.
Then function sendEmail posts data to the Azure Function to send email.
    // Sends HTTP POST request with EmailData in JSON format.
    ContactForm.prototype.sendEmail = function (emailData) {
        this._sendButton.button('loading');

        var _this = this;
        $.ajax(this._sendEmailUrl, {
            method: "POST",
            contentType: "application/json; charset=UTF-8",
            data: JSON.stringify(emailData)
        })
            .done(function () {
                _this._alertPanels.showSuccess();
                _this.clearForm();
            })
            .fail(function (jqXHR) {
                if (jqXHR.status === 400) {
                    _this._alertPanels.showValidationError();
                }
                else {
                    _this._alertPanels.showError();
                }
            })
            .always(function () {
                _this._sendButton.button('reset');
            })
    }
The function is quite simple. It disables Send button to not send the email twice accidentally. Then it posts email data in JSON format to Azure Function URL. The URL is configured in constructor of the object and it can be found in Azure Portal. Then, when sending email is successful, success message is displayed to user and form is cleared. Otherwise error message is displayed. And in the end Send button is enabled again.
And last function of ContactForm is to clear the form.
    ContactForm.prototype.clearForm = function () {
        this._contactFormName.val('');
        this._contactFormEmail.val('');
        this._contactFormSubject.val('');
        this._contactFormMessage.val('');
    }
And the only missing piece is AlertPanelsCollection object prototype to display user messages.
// Class to display and hide alerts and messages.
var AlertPanelsCollection = (function () {
    function AlertPanelsCollection(form) {
        this.success = form.find("#contactForm-alert-success");
        this.error = form.find("#contactForm-alert-error");
        this.validationError = form.find("#contactForm-alert-validationError");
    }

    AlertPanelsCollection.prototype.hideAll = function () {
        this.success.hide();
        this.error.hide();
        this.validationError.hide();
    }

    AlertPanelsCollection.prototype.showSuccess = function () {
        this.hideAll();
        this.success.slideDown();
    }

    AlertPanelsCollection.prototype.showError = function () {
        this.hideAll();
        this.error.slideDown();
    }

    AlertPanelsCollection.prototype.showValidationError = function () {
        this.hideAll();
        this.validationError.slideDown();
    }

    return AlertPanelsCollection;
}());
Duracellko.AlertPanelsCollection = AlertPanelsCollection;
Full JavaScript file can be found at https://github.com/duracellko/duracellko.net/blob/master/input/assets/js/Duracellko.ContactForm.js.
Summary
Now we have static website that uses jQuery to send data to Azure Function that sends email using SendGrid service.
Wyam is very flexible static site generator and therefore can include any HTML and JavaScript functionality. And thanks to jQuery it is very easy to implement UI logic and AJAX functionality. This can be efficiently combined with Azure Functions. This way it is possible to add some dynamic functionality to a static website.
Don't forget to change CORS settings of your Azure Functions to limit requests from your domain only.