When developing a Windows application using WinUI 3, by default it displays default Windows icon in taskbar:  Changing this icon is a little bit more complicated than in other .NET UI frameworks. In WinForms and WPF Window class has Icon property. And these frameworks have classes to work with icon objects. Universal Windows Platform application doesn't have window under control and the platform automatically sets the icon from application assets.
Program icon
In Windows every executable file can have a custom icon. That is the icon that you can see in Windows Explorer, when an executable file is listed. In .NET applications this is set the same way, no matter if the application is WinUI, WinForms, or even console application. Simply add an icon (e.g. MyApp.ico) to your .NET project and add ApplicationIcon element to the project file. For example:
<PropertyGroup>
  <ApplicationIcon>MyApp.ico</ApplicationIcon>
</PropertyGroup>
This is the first step to setup your application icon. When the application is compiled, then you can see the icon in Windows Explorer. However, running the application would still display the system icon in Windows taskbar. Except in WPF that by default displays the application icon for all windows.
Loading icon from a file
In WinUI 3 the Window class has AppWindow property that allows system specific customization of the application window. And AppWindow class has SetIcon method that can be used to setup icon of the window. The method has 2 overloads. The first overload accepts a path to .ico file.
So the first option is to include the .ico file in the published application folder and load it from there. This can be done by adding Content in the .csproj file. For example:
<ItemGroup>
  <Content Include="MyApp.ico" />
</ItemGroup>
And then setting up the icon in constructor of the window.
public sealed partial class MainWindow : Window
{
    public MainWindow()
    {
        InitializeComponent();

        string iconPath = System.IO.Path.Combine(Package.Current.InstalledLocation.Path, "MyApp.ico");
        AppWindow.SetIcon(iconPath);
    }
}
This solution has desired effect of displaying correct icon in Windows taskbar. However, it is unusual to include .ico file in the application folder and having dependency on it. Therefore, the next step is to include the icon directly in the executable.
Loading icon from a resource
Including icon in the executable file was done in the first step using ApplicationIcon element. The problem is, how to load it into the Window object? And for that there is second SetIcon method overload that accepts IconId type. We need some Win32 API to get the IconId value. This is full class with GetApplicationIconId method to get the IconId value that can be passed to SetIcon method.
public static class IconService
{
    public static IconId GetApplicationIconId()
    {
        // Application resource ID assigned by Visual Studio to .NET applications
        // https://devblogs.microsoft.com/oldnewthing/20250423-00/?p=111106
        IntPtr iconResourceId = new(32512);

        IntPtr hModule = NativeMethods.GetModuleHandle(null);
        if (hModule == IntPtr.Zero)
        {
            return default;
        }

        IntPtr hIcon = NativeMethods.LoadIcon(hModule, iconResourceId);
        if (hIcon == IntPtr.Zero)
        {
            return default;
        }

        return Win32Interop.GetIconIdFromIcon(hIcon);
    }

    private static class NativeMethods
    {
        [DllImport("kernel32.dll", EntryPoint = "GetModuleHandle", CharSet = CharSet.Unicode)]
        [DefaultDllImportSearchPaths(DllImportSearchPath.System32)]
        public static extern IntPtr GetModuleHandle(string? lpModuleName);

        [DllImport("user32.dll", EntryPoint = "LoadIconW")]
        [DefaultDllImportSearchPaths(DllImportSearchPath.System32)]
        public static extern IntPtr LoadIcon(IntPtr hModule, IntPtr lpIconName);
    }
}
The main function used here is LoadIcon that returns Icon handle. The first parameter of the function is handle of the module that the icon should be loaded from. If it is NULL (IntPtr.Zero) then the function loads Windows system icon and not your custom application icon. Therefore, it is necessary to call function GetModuleHandle to get handle of the module representing the executable file.
Calling GetModuleHandle is simple. It is sufficient to pass null. That returns handle of the module that started execution of the current process. And that is likely your executable file.
The second parameter of the LoadIcon function is more tricky. By definition, it is LPCWSTR and that is string pointer. Notice, however, that we declared it as IntPtr and not string. Resources (e.g. icons, strings, images) in modules (.exe or .dll files) can be accessed by name or by index. And LoadIcon function accepts both. When the value of second parameter is lower than 65536, then it is considered as a resource index and icon with the specified index is loaded. Otherwise, it is considered as a string pointer and icon with the specified resource name is loaded.
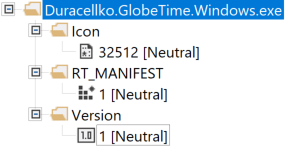
We want to use the resource index, therefore the function is declared with IntPtr type and not string. Specifically, we use fixed index value 32512. According to What resource ID should I give my application’s main icon?, Visual Studio assigns this specific index to the application icon. You can also verify that by opening the compiled executable file in Visual Studio. This displays all resources in the executable file.
Last part of this method uses Win32Interop.GetIconIdFromIcon to convert the icon handle to IconId. Notice that after each Win32 API call, the method checks if the result is non-zero. When it is zero, then Win32 function failed, so the method returns default IconId.
Last step is to set the icon in Window class constructor. Btw, the default (or empty) IconId value, would instruct WinUI to use default system icon.
public sealed partial class MainWindow : Window
{
    public MainWindow()
    {
        InitializeComponent();

        AppWindow.SetIcon(IconService.GetApplicationIconId());
    }
}
Note: This example has only single application window. When the window is closed, the whole application is closed. So the icon is loaded only once and it is never released using DestroyIcon function, because it is needed for entire application lifetime.